RLS, Dynamic Data Masking and Always Encrypted
Jamey Johnston (@STATCowboy)
NOTE: Demo requires SQL Server 2016 CTP 2.4+ or Azure SQL Database v12.
Overview of the Demo
Security is a vital part of a DBA, Developer and Data Architects job these days. The number of attacks on databases of major retailors from criminals looking for information like email addresses, ID numbers, birthdays, etc. on individuals to be exploited and sold is ever increasing. The demo contained in the link at the bottom of this page is meant to showcase three of the new features Microsoft is bringing to the Azure SQL Database v12 and SQL Server 2016 to help combat this cyber-attacks:
Row Level Security (RLS)
Dynamic Data Masking
Always Encrypted
This first part of the demo is meant to show how an organizational hierarchy and asset hierarchy can be leveraged together to provide Row Level Security on tables in a SQL Server database using the new predicate based RLS feature in SQL Server 2016 and Azure v12. This demo is completely made up oil well production data for a fictitious organization with 153 fictional employees and come as in with ABSOLUTELY NO WARRANTY or GUARANTEE!
Also, the demo will show how to use RLS with the HieararchyID Datatype, the new Dynamic Data Masking and Always Encrypted Security Features.
This post is about the demo which will show you an advanced implementation template for RLS as well as some of the other security features. Please use the links above to the official Microsoft documentation to learn about each feature first before trying out the demo as it will help you understand the demo better.
If you attended the session at SQL Summit 2015, Overview of Security Investments in SQL Server 2016 and Azure SQL Database [DBA-327-M], which I co-presented with the Microsoft SQL Server Security team this is the demo we used at the end.
Asset and Organization Hierarchies and RLS
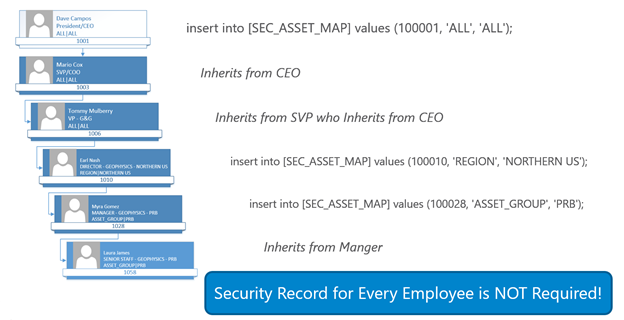
The basis of the security is nodes in the organizational hierarchy are granted access to levels in the asset hierarchy and those grants filter down to the members below in the hierarchy. This allows for inheritance of permissions via the Organization and Asset Hierarchy (i.e. Child nodes can inherit from Parent Nodes).
Functionality is built-in to the model to override the security model for a lower member including denying access altogether (‘NONE’ in the security map) or granting access to all data (‘ALL’ in the security map) via exceptions (SEC_USER_EXCEPTIONS). A base user table exists (SEC_ORG_USER_BASE) that has the relationship of employee to manager as well as the organizational unit id for the employee. This table would likely be fed from an HR system in a production scenario. A master table for the wells (WELL_MASTER) contains the asset hierarchy to filter security to the well data. Read the notes about the tables below for more details.
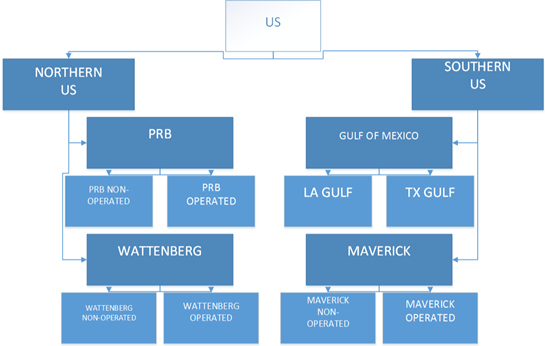
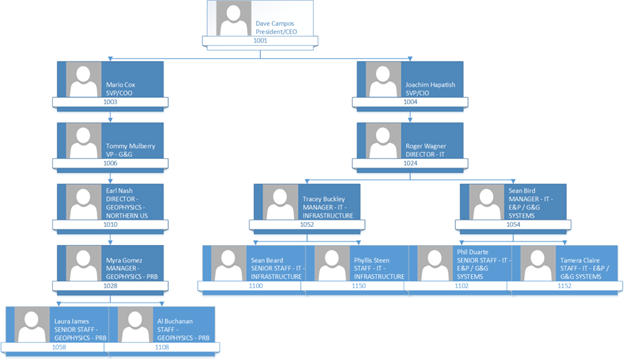
Below shows what an Asset and Organizational Hierarchy would look like (also, this is what is in the demo) and finally a walk down one branch of the organizational hierarchy to see how to apply RLS against the Asset Hierarchy.
Asset Hierarchy (snippet)
Organizational Hierarchy (snippet)
Asset and Organization Hierarchy and RLS (CEO to one USER)
Scripts and Explanations
There are 6 scripts to run to see the entire demo (and you just run them in the order they are number, 1 – 6):
1 – Oil&Gas RLS Demo – BuildTables.sql
The script will create the database, oilgasrlsdemo2016, and the tables needed for the demo
The Tables are as such:
- ASSET_HIERARCHY – Table contains the asset hierarchy and is used to build the demo data for the asset hierarchy in the Well_Master table.
- DATES – Generic table to hold a date dimension for use later in an Excel Power Pivot model.
- SEC_ASSET_MAP – Table contains the entries mapping the organization units to the asset hierarchy levels for access to the data. The table would be managed by the security team for the application. Users and their subordinates are denied access to data via an entry of ou, ‘NONE’, ‘NONE’ or granted all access via an entry of ou, ‘ALL’, ‘ALL’.
- SEC_ORG_USER_BASE – Table contains the employees including the employee to manager parent/child relationship to build an organization hierarchy and the organizational unit id for mapping to asset hierarchy levels for security. This table would likely be fed from an HR system. Also, will demonstrate Always Encrypted in this table.
- SEC_ORG_USER_BASE_HID – Same as SEC_ORG_USER_BASE but includes HierarchyID column to demonstrate RLS with HierarchyID data types and to demonstrate Data Masking.
- SEC_ORG_USER_BASE_MAP – Table contains the employee data including an entry (SECURITY_CLEARANCE) to denote the security clearance the employee is granted by walking down the organization hierarchy and finding the lowest level above including themselves that has been granted access to data. The SEC_ASSET_MAP table is used along with the SEC_ORG_USER_BASE table to generate the data in this table. The procedure REFRESH_SECURITY_TABLES is called to refresh the data in this table.
- SEC_USER_EXCEPTIONS – Table contains entries to allow for overrides of the organization hierarchy based model. Any employee entered here will use permission defined in this table instead of what is inherited from the organizational hierarchy.
- SEC_USER_MAP – This table is generated by the REFRESH_SECURITY_TABLES procedure and generates the asset level access for each user in the database based upon the values in the security tables SEC_ORG_USER_BASE_MAP, SEC_ASSET_MAP and SEC_USER_EXCEPTIONS. This is the ONLY table used by the functions for the Security Policy. The other SEC_ tables are used to generate this table for RLS.
- WELL_DAILY_PROD – Contains COMPLETELY made-up and randomly generated daily well production data for Oil, Gas and NGL. Primary key is WELL_ID and RLS is achieved by using the asset hierarchy in the WELL_MASTER table to filter the WELL_IDs. This is a Clustered ColumnStore Indexed table.
- WELL_MASTER – Contains COMPLETELY made-up and randomly generated master well data including the made up asset hierarchy. This is the main business table used for RLS for ALL well tables.
- WELL_REASON_CODE – Contains COMPLETELY made-up and randomly generated daily well downtime data for Oil, Gas and NGL. Primary key is WELL_ID and RLS is achieved by using the asset hierarchy in the WELL_MASTER table to filter the WELL_IDs.
2 – Oil&Gas RLS Demo – LoadTables.sql
This script is used to load or generate the demo data including user and security tables and hierarchy and well data. There are two parameters close to the top that can be used to specify the amount of data to load – @wellcount and @drillyearstart. @wellcount specifies the number of wells to generate and @drillyearstart specifies the first possible year to use for a well. The start date for a well will be randomly selected between @drillyearstart and the current year the script is run.
3 – Oil&Gas RLS Demo – Security Setup.sql
This script sets up the RLS functions, policies and the procedure REFRESH_SECURITY_TABLES. The procedure REFRESH_SECURITY_TABLES is used to generate the RLS security mappings in the SEC_ tables as described in the sections above. In a production environment this procedure would need to be run every time the hierarchies were updated or new users were added to the database.
This script also will build users in the database based on the userids generated in SEC_ORG_USER_BASE table for testing RLS.
4 – Oil&Gas RLS Demo – Test RLS Security.sql
This script contains sample queries to test RLS at different levels in the organizational hierarchy and asset hierarchy. It also will add another entry in the security table granting a user access to another level in the hierarchy along with their current level and run the procedure to update the security to include this new entry.
5 – Oil&Gas RLS Demo – RLS Security with HierarchyID and Data Masking.sql
This script makes a copy of the SEC_ORG_USER_BASE table called SEC_ORG_USER_BASE_HID that contains a version of the Organizational Hierarchy using the HierarchyID Datatype. It shows how to populate a HierarchyID Datatype from a Parent/Child Hierarchy and will implement RLS security using the HierarchyID Datatype as well as add some new columns, EMAIL_ADDRESS and DOB (Date of Birth) to the table to highlight Dynamic Data Masking in SQL Server 2016.
Info about HierarchyID – https://msdn.microsoft.com/en-us/library/bb677290.aspx
6 – Oil&Gas RLS Demo – Always Encrypted.sql
This script will setup the Master and Column keys for Always Encrypted as well as add a new encrypted column, SSN, to the SEC_ORG_USER_BASE table to test Always On Encryption. NOTE: If your database you are using for this demo is on a separate server than where you will run the application (see below) included in the download to test all the features you will need to run this script from SSMS on the machine you run the application and it will need .NET 4.6.
ERD of O&G RLS Demo DB
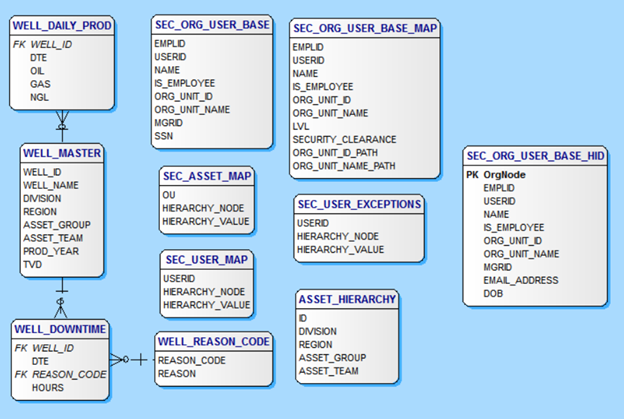
Demo Application
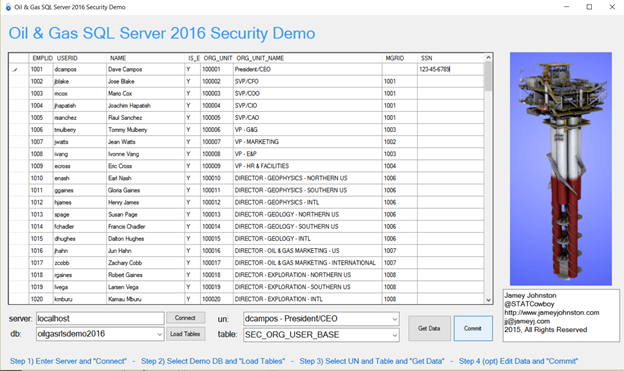
There is an application built in Visual Studio 2015 (.NET 4.6) that you can use to test out the demo once you run all 6 scripts (Source code is included as well!). Just run the EXE in the download on a machine with .NET 4.6 installed and the instructions are at the bottom of the application (see screenshot below).
Use the WELL_MASTER, WELL_DAILY_PROD and/or WELL_DOWNTIME to test the Parent/Child RLS Demo (Scripts 1 – 4). Use the SEC_ORG_USER_BASE_HID table to test the RLS with HierarchyID and Dynamic Data Masking (Script 5). Finally, use the SEC_ORG_USER_BASE table to test the Always Encrypted. You can EDIT the fields by clicking inside of them so for the Always Encrypted Demo you would click in the cell for SSN for an employee and enter a valid SSN and click “Commit” (see screenshot below).
Demo Instructions, Download and Contents
Below is the contents of the demo download and descriptions about each file/folder. To run through the demo, do the following:
- Download and extract the files to a folder
- Run all the scripts in the MSSQL 2016 folder in order, 1-6, on SQL Server 2016 CTP 2.4+ or Azure SQL Database v12.
- Then use the OGSecurityDemo2016.exe file to run the Demo Application
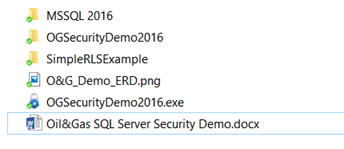
MSSQL 2016 – Folder with the 6 demo scripts
OSSecurityDemo2016 – Folder with the source code (VS2015 .NET4.6) for the Demo Application
SimpleRLSExample – Folder with a simple RLS Demo (start slow)
O&G_Demo_ERD.png – Graphic of ERD
OGSecurityDemo2016.exe – Demo Application (you can just run it if you have .NET 4.6)
Oil&Gas SQL Server Security Demo.docx – Overview of the Demo
Link to download – https://onedrive.live.com/redir?resid=4930901E9435C751!135238&authkey=!AF7fpcw5K5waySg&ithint=folder%2czip
Hope you enjoy and tweet me @STATCowboy if you have questions, comments or concerns or need help with the demo!