

April 7, 2015
Azure SQL Database is a relational database-as-a-service that allows for scaling up to thousands databases. It is a self-managed service that allows for near-zero maintenance, in other words, Microsoft handles all the backups, patching and redundancy. Azure SQL Database offers service tiers that allows for dialing up or down the horsepower as needed which also means the pricing can scale up or down. Pricing of the Service Tiers range from ~ $5/month to the slowest and smallest in size to ~$3,270/month for the fastest and largest.
More Info on Azure SQL Database
In this post we will walk through the steps to create an Azure SQL Database using the new Azure Portal. Please note the new Portal is still in beta so the steps and screenshots may change as Microsoft still rolls out the new portal.
This post is based on the documentation on Azure, Get started with SQL Database by jeffgoll, which shows how to setup an Azure SQL Database using the older Azure Portal.
Step 1: Create an Account on Azure
This step can be skipped if you already have an account on Azure. If not, go to http://azure.microsoft.com and click on the “Free Trial” in the upper right corner to get started.
Step 2: Logon to the New Azure Portal and Provision a Virtual Server and SQL Database
- Access the new Azure portal at http://portal.azure.com and login with your Azure Account.
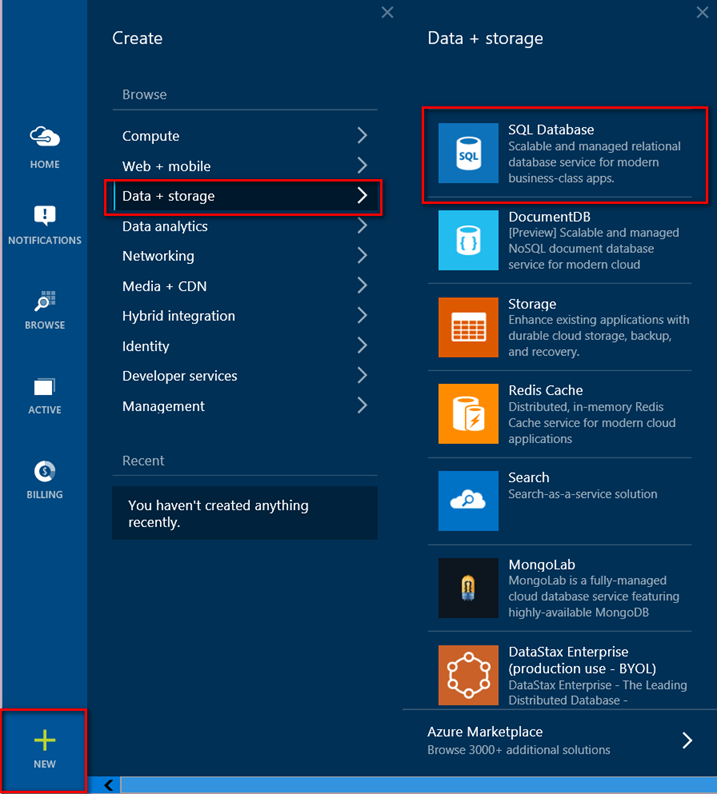
- Click “New” at the bottom left of the page, then “Data + Storage”, then “SQL Database” to start the SQL Database wizard.
-
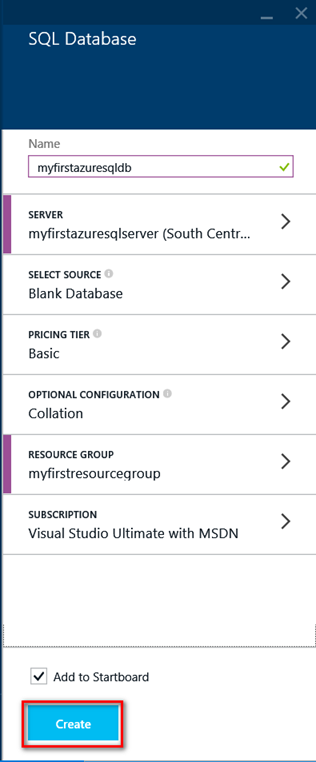
In the “SQL Database” panel enter your desired Azure SQL Database name in the “Name” field (e.g. myfirstazuresqldb) then click “Server / Configure required settings“. In the Server Panel pop-out to the side, click “Create a new server” (I am assuming if you are reading this tutorial you don’t have an existing Azure SQL Server setup!).

-
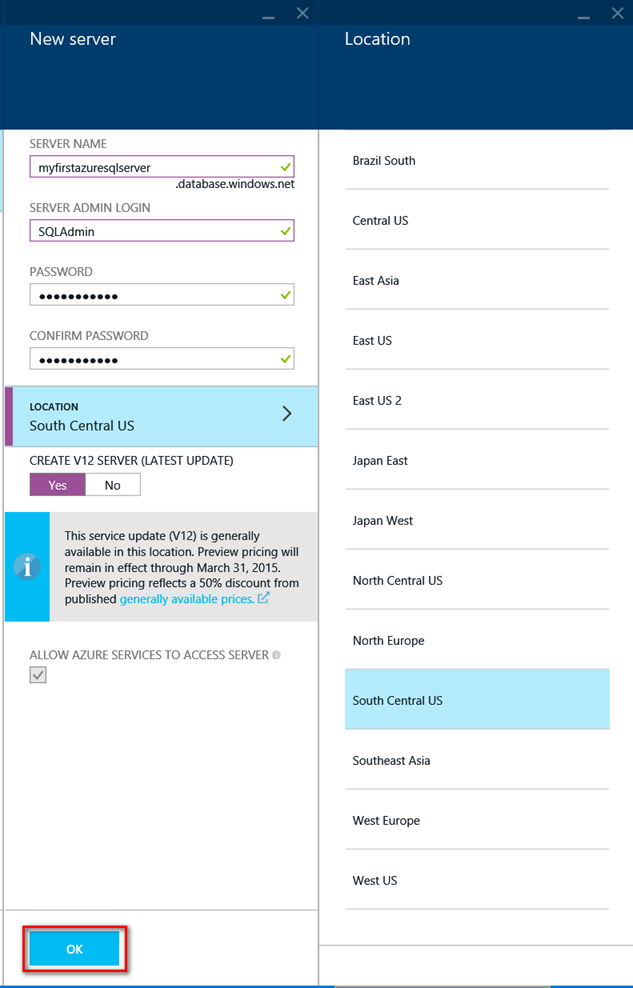
In the “New Server” panel pop-out enter an Azure SQL Server name in the “SERVER NAME” field (e.g. myfirstazuresqlserver), a Server Admin Login account name in the “SERVER ADMIN LOGIN” field (e.g. SQLAdmin), a password in the “PASSWORD” field and enter the password again in the “CONFIRM PASSWORD” field. Choose the location where you want the server to reside by clicking in the “LOCATION” area and choosing the Location. Leave the “Yes” chosen in the “CREATE V12 SERVER (LATEST UPDATE) so we can learn some new features in a later blog post. Leave “ALLOW AZURE SERVICES TO ACCESS SERVER” checked. Click “OK” at the bottom of the “New Server” panel to continue.
-
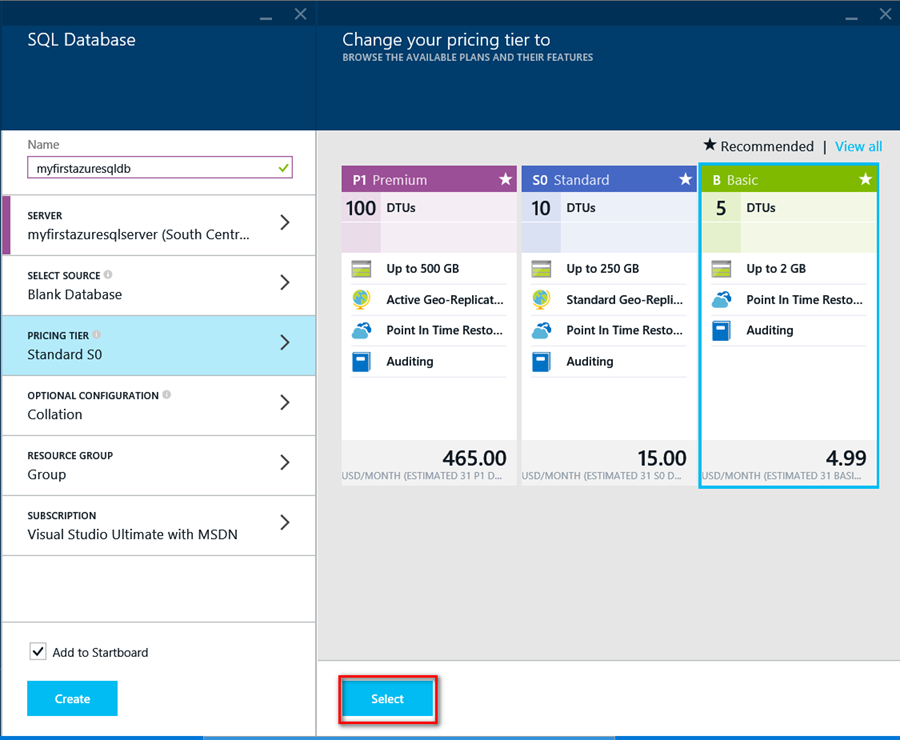
Back on the “SQL Database” panel leave “Blank Database” selected in “SELECT SOURCE” option and click on the “PRICING TIER” option and choose “B Basic” in the Pricing Tier panel pop-up and click “Select” at the bottom.
-
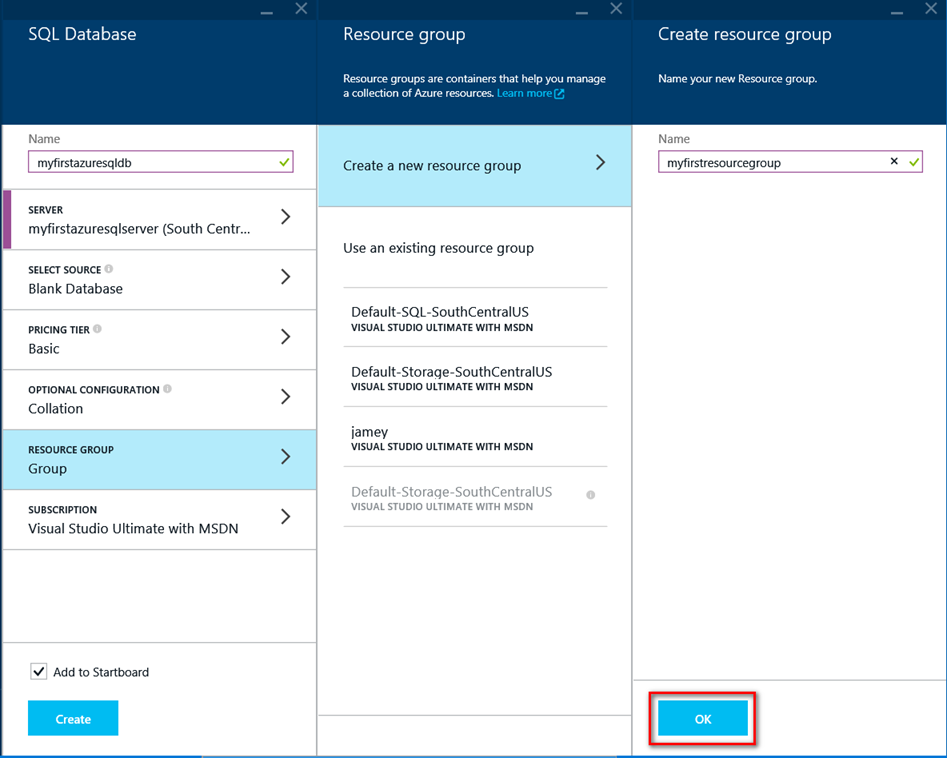
On the “SQL Database” panel you can set the desired Collation but we will leave it the default for now. Click on “Resource Group”, then in the “Resource Group” panel choose “Create a new resource group” and then in the “Create resource group” panel type a resource group name in the “Name” field (e.g. myfirstresourcegroup”).
-
Choose the “Subscription” (e.g. Visual Studio Ultimate with MSDN) to pay for the Azure service. Check “Add to Startboard” to have the SQL Database show up on the Portal front page. Then click “Create” to begin provisioning your new Azure SQL Database! 🙂
-
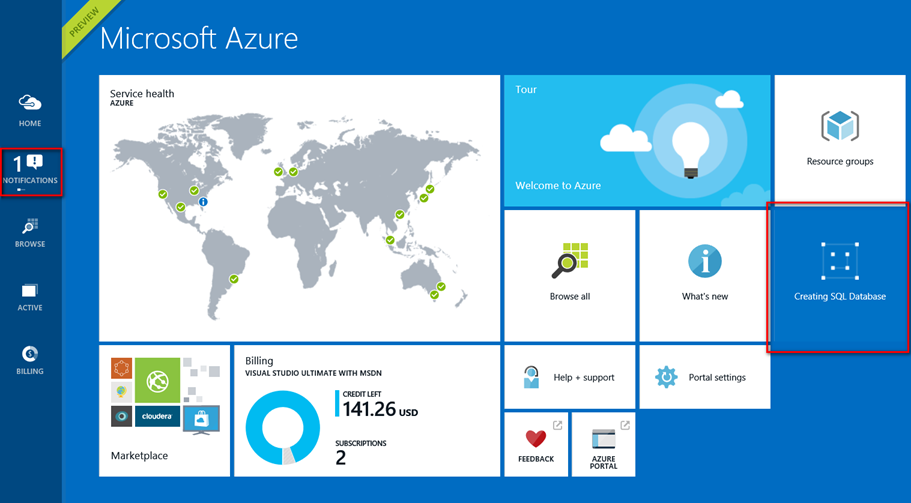
The page will go back to the Portal front page and a tile will appear with the title “Creating SQL Database”. Also, in the side bar to the left you will see a notification.
-
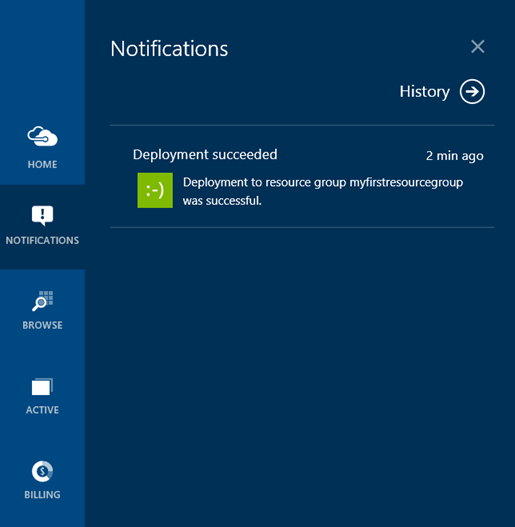
Once the database is provisioned the pages will refresh and show the Azure SQL Database Dashboard page.
-
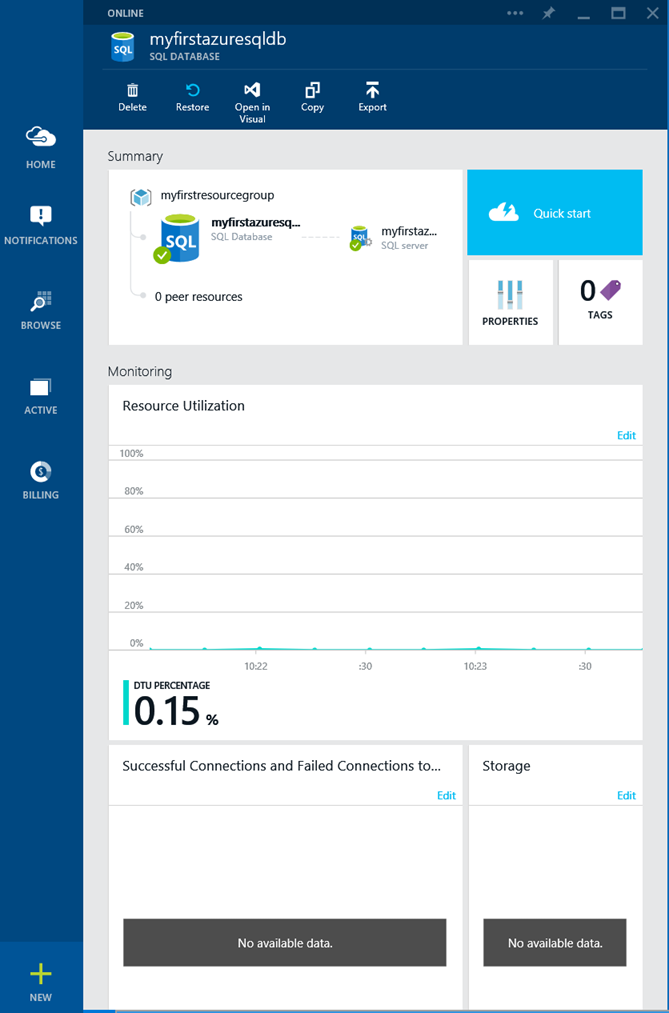
Your database is provisioned!
Step 3: Add Firewall Rule to Access Azure SQL Database
-
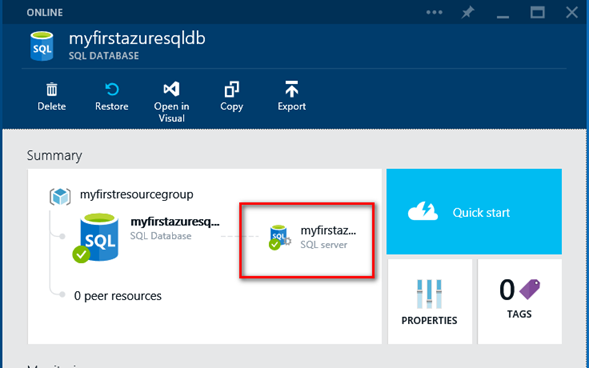
Click on the Azure SQL Server under the “Summary” section.
-
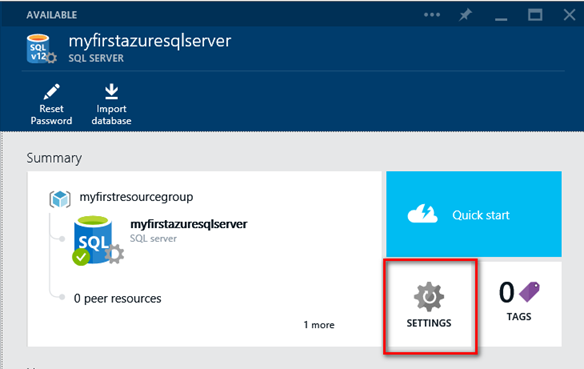
The “SQL Server” panel will pop-out to the right, click “Settings” to open up the SQL Server configuration panel to the right.
-
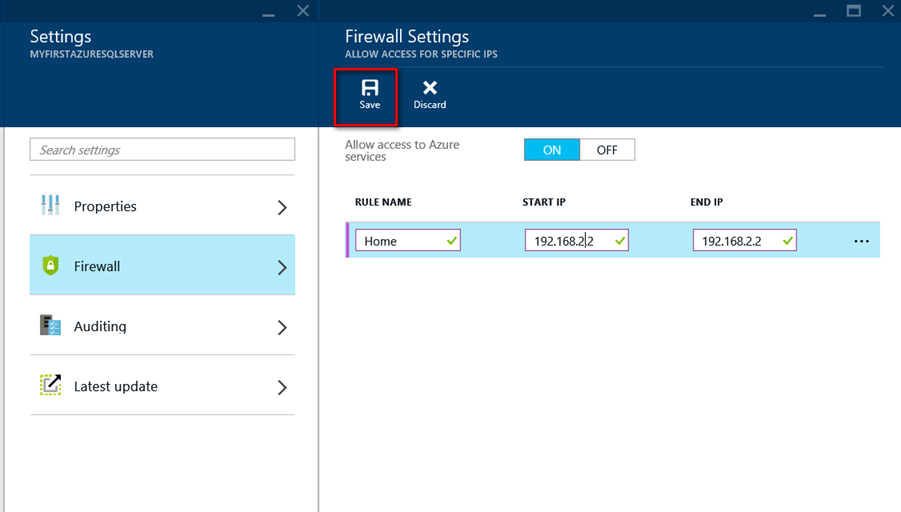
In the “Settings” panel click on “Firewall”. In the “Firewall Settings” panel that pops-out enter a “RULE NAME” (e.g. Home), the START IP and END IP which will probably be the same IP address if testing from home. You can use a website like whatismyip.com to get your external IP address. Click “Save” at the top once finished entering the values. (NOTE: The values below are not valid and you should enter the correct ones for your location).
Your IP may change so check periodically to make sure you have the correct IP addresses in the firewall rules. Also, if trying to connect from work your work firewall may block access to the default port of 1433 which is used for access to the Azure SQL Database so if you are having issues trying to connect from work they may be your issue! J
-
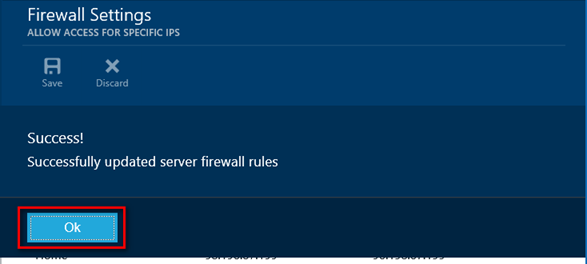
A message should appear indicating the firewall rules were successfully updated. Click “Ok”.
- Firewall is configured.
Step 4: Setup SQL Server Management Studio to Manage and Access Azure SQL Database
-
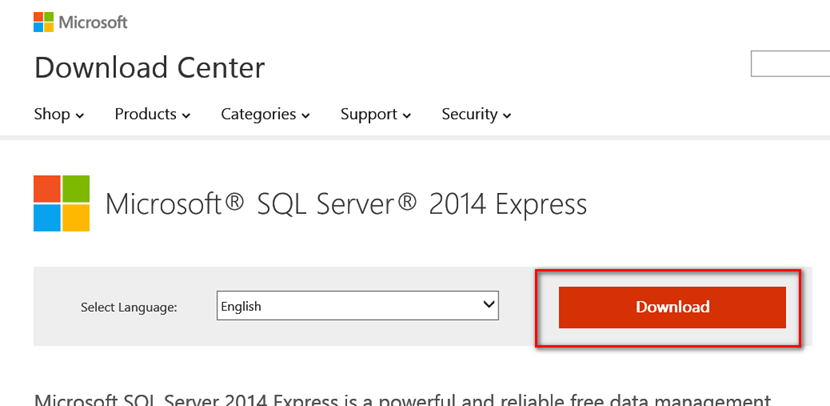
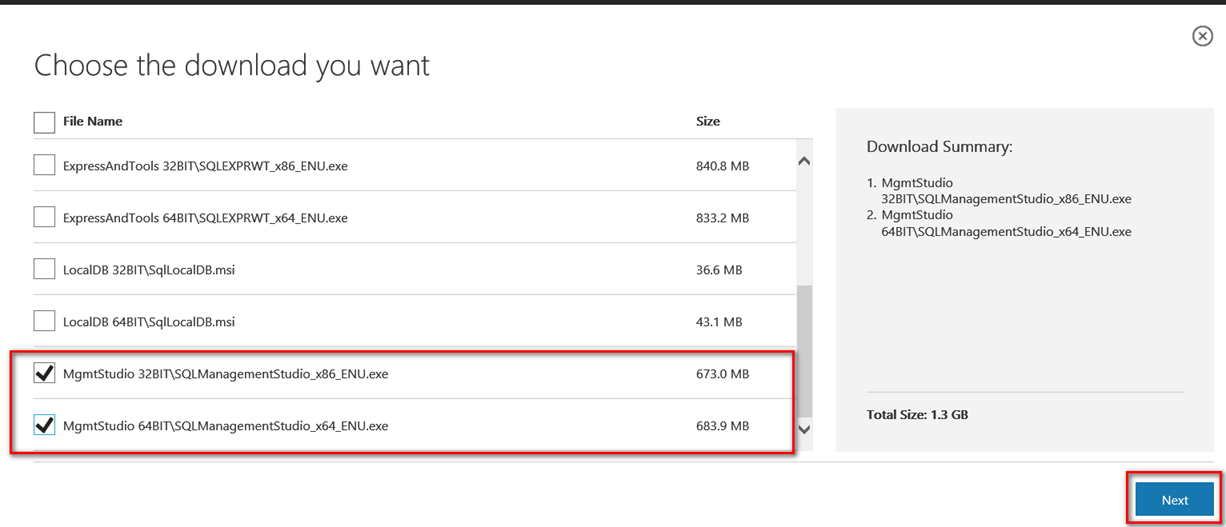
Finally to test your new Azure SQL Database download the SQL Server 2014 Management Studio Express and install using the defaults. Choose the 32-bit or 64-bit version depending on your O/S version (probably 64-bit for most).
-
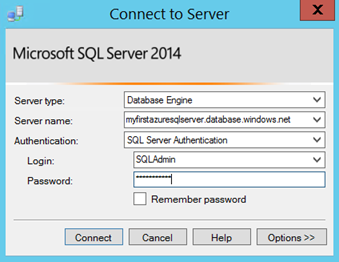
Launch SQL Server 2014 Management Studio from your PC and login to the server you created in Step 2 using the server name, admin account and password and click “Connect”.
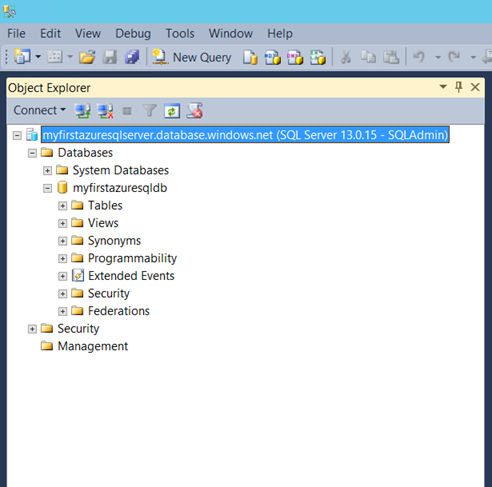
- Congratulations you have created your first Azure SQL Database!