Power BI dataflows – Enabling BI Professionals and Data Scientists

by Jamey Johnston, Sr. Data Scientist/Engineer, @STATCowboy


Why Power BI dataflows

Recently, I was reading an excellent article titled “Agile Digital Transformation for Data-Driven CEOs with Power BI” by Jen Stirrup (t|b) on why Power BI is a valuable tool for data driven CEOs to change the culture of their organizations. One of my favorite features to come to Power BI is Power BI dataflows and I believe it will improve the data management and usage in organizations. This article will discuss how dataflows can be used by BI professionals, data engineers and data scientist to improve their data management skills and build valuable insights for their companies.

I work with data scientist on a regular basis who spend a lot of time cobbling together data from different data sources to build models in Python using packages like Scikit-learn. These data scientist will often dump the data into CSV files and read them in as Panda dataframes or NumPy arrays to start the data science algorithm magic. This is messy! The data scientist often ask for new dumps of the data or losing the data dumps they have. I believe Power BI dataflows can really assist to make data management better for BI professionals, data scientist and data engineers.

What is Power BI dataflows

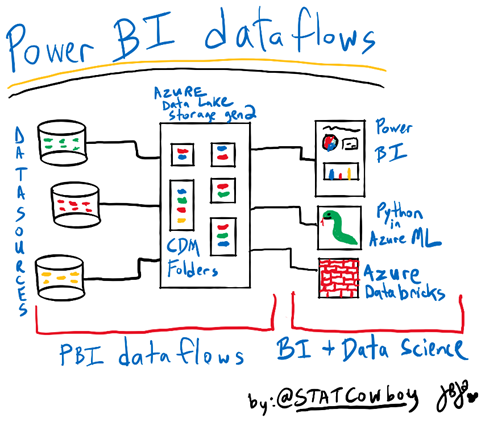
Power BI dataflows enable organizations to wrangle data spread across multiple data sources in the cloud or on-premises into Azure Data Lake Storage gen 2 in a Common Data Model. Dataflows are created and managed in workspaces in the Power BI service via an online version of the well-known Power Query interface. Data in Power BI dataflows can be leveraged by data scientist and data engineers in Azure services like Machine Learning (ML), Databricks and Azure Synapse Analytics because the data is stored in Common Data Model in Azure Data Lake Storage gen 2. Citizen Data scientist can take advantage of Microsoft Cognitive services or Azure Automated ML in dataflows. Microsoft also has Python packages like the Azure Datalake service client library for Python to connect to Azure Data Lake Storage gen 2 which can be used to connect to Power BI dataflows data to build data models in packages like Scikit-learn. Power BI reports can also connect to Power BI dataflows to build reports and dashboards.

Power BI dataflows Demo

Let’s look at Power BI dataflows. I have uploaded a CSV file of the Ames Housing Data
from Kaggle on my GitHub in a repository, https://github.com/STATCowboy/pbidataflowstalk, for Power BI dataflows.

To use Power BI dataflows you will need a Pro license of Power BI and to use some of the advanced features, like Cognitive Services or Automated ML, you will need Premium capacity. Your Power BI tenant admin and Azure admin will have to enable dataflows and connect to a Azure Data Lake Storage gen 2 to use the Power BI dataflows and integration with Azure Data Lake.

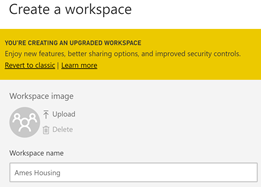
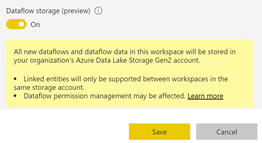
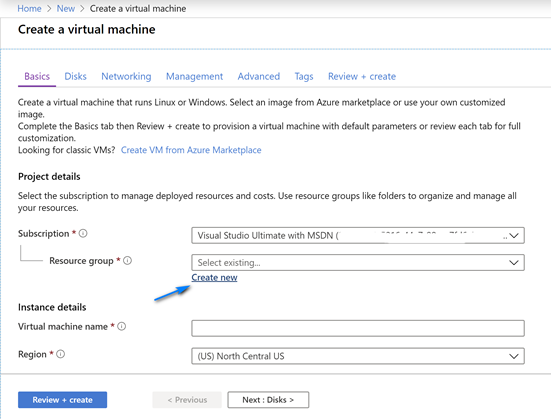
Once Power BI dataflows is setup, connect to your Power BI Service and create a workspace called “Ames Housing” and enable dataflows (under Advanced at the bottom) for the workspace.
Note, the Power BI service will manage the ACL (permissions) in the Azure Data Lake storage utilizing the users defined in the workspace automatically.


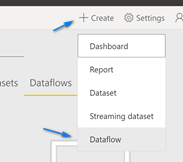
Now let’s import the CSV file of the Ames Housing data using dataflows. In your Ames Housing workspace click the “+Create” at the top and choose “Dataflow”.


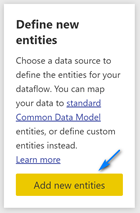
Click the “Add new entities” button on the left panel on the page to open Power Query online to add the data.


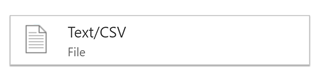
In the Power Query Online screen click “Text/CSV” button to add the Ames Housing data into dataflows.
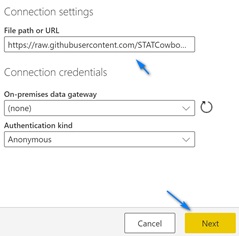
In the File path or URL textbox enter https://raw.githubusercontent.com/STATCowboy/pbidataflowstalk/master/AmesHousing.csvand then click the yellow “Next” button at the bottom right. Notice, you can connect to your On-premises data gateway if you have on-premises data.


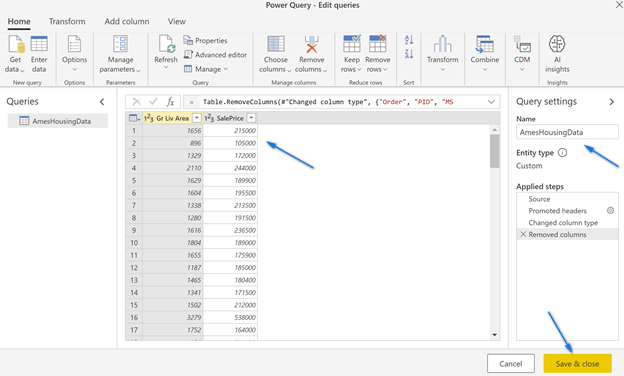
In the Power Query Online editor remove all the columns except, “Gr Living Area” and “SalesPrice”, name the table “AmesHousingData” and click “Save and close”.


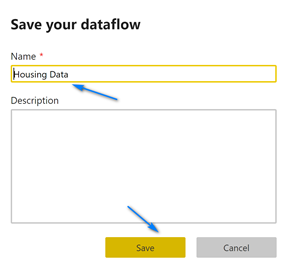
The next screen that pop-up is where we name our dataflow. Name your dataflow “Housing Data” and click “Save”. When it finishes saving click the “Refresh Now” button to populate your dataflow with data. Note, you can setup scheduled refreshes in dataflows including incremental refreshes.


You should have data in your dataflow stored in your Azure data lake now!

Power BI Desktop

Now that we have data in our dataflow let’s connect to it using Power BI desktop.

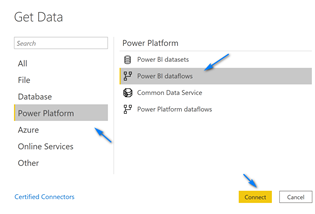
Open Power BI Desktop and click the “Get Data” button at the top or on the startup screen.

Select “Power Platform” on the left, then “Power BI dataflows” on the right and click “Connect”.

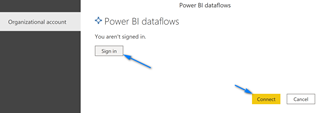
If this is the first time connecting to dataflows you will need to click the “Sign In” button and login to your Power BI Service. Once you login click “Connect”.


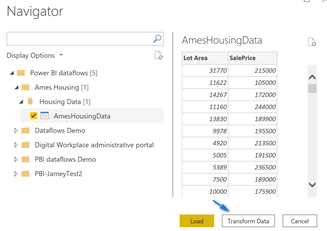
Once you are connected navigate to the “AmesHousingData” table and select it and click “Transform Data” or “Load” if you want and you will now have your Power BI dataflows data in Power BI Desktop to work with!


CDM Folders and Azure Data Lake Storage gen 2 (ADLS gen 2)

As mentioned earlier you can connect your Power BI dataflows to your own Azure Data Lake Storage and use it for data science or data engineering. The great thing that Microsoft did with Power BI dataflows is deploy the data into the Common Data Model in folders in Azure Data Lake Storage gen 2.

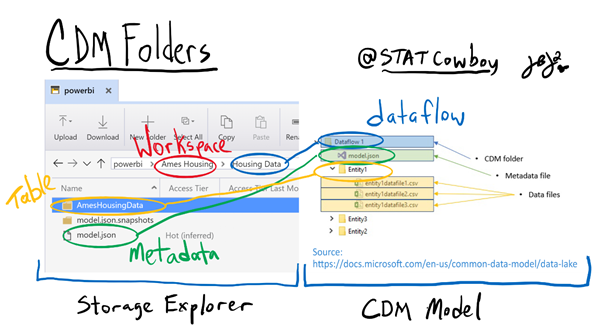
CDM Folders conform to “specific, well-defined, and standardized metadata structures and self-describing data. These folders facilitate metadata discovery and interoperability between data producers and data consumers”. (https://docs.microsoft.com/en-us/common-data-model/data-lake)

This CDM Folders have a metadata file, model.json, which follows the Common Data Model metadata format. The file contains information about the entities (table) and attributes, and links to underlying data files in the CDM Folder. The data files, currently CSV but support for other formats is in the works, are stored in folders for the entities.

If you look at the diagram below it shows the layout of the “Ames Housing” workspace and “Housing Data” CDM folder after it was written to the ADLS gen 2 storage. On the left is the view from Storage Explorer and on the right is the diagram of a CDM folder from the Microsoft Power BI dataflows documentation.

Storage Explorer
https://azure.microsoft.com/en-us/features/storage-explorer/

Python Demo to read CDM Folder for Data Science

Now that you have your data in ADLS gen 2 you begin to do the data magic! The azure-storage-file-datalake package was recently released to access hierarchical namespace enabled (HNS) ADLS gen 2 accounts. The below referenced Python demo will use this new package to access the CDM folders written by Power BI dataflows. It will also use the CDM helper file located here.

To run the demo follow the instructions here to setup a Conda environment using the below referenced YAML file to run the Python Demo below. Edit the Credentials.py file and update the accountName and credential variables to your values. Then run the AMES CDM Access Demo – Azure ML Python.py file to pull the data from entity, AmesHousingData, from the Ames Housing/Housing Data dataflow and run a simple OLS Linear Regression to predict SalesPrice from Gr Liv Area. You can run this in Visual Studio Code or Azure ML or any tool that can run Python like Jupyter Notebooks.

YAML file for Python Env
https://docs.conda.io/projects/conda/en/latest/user-guide/tasks/manage-environments.html#creating-an-environment-from-an-environment-yml-file


Python Demo
https://github.com/STATCowboy/pbidataflowstalk/tree/master/Azure%20ML%20Python%20Example


CDM Helper
https://github.com/Azure-Samples/cdm-azure-data-services-integration/tree/master/AzureMachineLearning

Databricks Demo to read CDM Folder for Data Science

You can also access the data in powerful tools like Azure Databricks. Follow the instructions on this GitHub, by Ted Malone (t|b) to configure you Databricks to access your Power BI dataflows in CDM Folders.

Databricks Setup
https://github.com/temalo/spark-cdm/blob/master/docs/Getting%20Started.md.

Sample code to connect to the Ames Housing Data you loaded in your Power BI dataflows in the demo above is in my GitHub.

Sample Code
https://github.com/STATCowboy/pbidataflowstalk/tree/master/Databricks%20Example.

Conclusion

I hope this article helped to introduce and showcase some of the great features of Power BI dataflows. To learn more about Power BI dataflows check out the official Microsoft documentation here. Also, I recommend following Matthew Roche (t|b) who works for Microsoft and evangelizes Power BI dataflows. Finally, follow me on Twitter @STATCowboy, connect up with me on LinkedIn at https://www.linkedin.com/in/jameyj/ or check out my blog, https://www.statcowboy.com to keep in touch.

GitHub Repo of Code
https://github.com/STATCowboy/pbidataflowstalk

Azure Virtual Machine (VM), Azure Bastion, iPad Pro, Surface Arc Mouse … ultimate portability!

Azure VM on iPad

I really wanted to JUST carry my iPad around at conferences. The problem was that I often needed a Windows O/S “machine” to complete task like code Python in VS Code or remote into my office computer.

So, what to do. The solution was simple I thought … use an Azure Virtual Machine and the Remote Desktop (RDP) app from Microsoft on my iPad. However, that was not an ideal solution as you really need a mouse to work well on Windows and the iPad does not support a mouse … or at least it USED to not support a mouse. Enter iPadOS 13! With iPadOS 13 you can now use a Bluetooth mouse (like the Surface Arc Mouse, the one I use!) with your iPad. Now I have a solution I can use.

Read this article from 9to5 Mac, How to use mouse with iPad, to learn how to setup your mouse with you iPad. Next, read the rest of this blog post to setup an Azure Virtual Machine (VM) and configure it for use with your iPad … or any other device that support RDP or just has a browser (we can use Azure Bastion to connect via a browser … but at a small cost[$] that we will discuss later).

This blog will show you how to setup and configure the following in Azure and on your iPad (or a PC, Mac or Android table) to compute anywhere using Azure:

Setup Azure Virtual Machine

  1. Navigate to the Azure Portal (https://portal.azure.com) and click the “Create a resource” button at the top of the page.
  2. In the Azure Marketplace click “Compute” then click “Virtual Machine” to begin the wizard to create a Virtual Machine.
  3. In the Virtual Machine Wizard select the desired subscription you desire to create the VM and select the Resource Group to create the VM inside. If you don’t have a resource group already, click “Create new” under Resource Group to create a new Resource Group. Enter desired name in pop-up for Resource Group and click “OK”.
  4. Under Instance details enter your desired VM name, pick your region, your O/S (in my case just want the latest Windows 10 Pro build – 1809) and your VM size (click “Change size” to select size) for your VM. For demo purposes I will pick a small VM size. You should pick the appropriate VM size for your needs. Note you can shutdown and stop the VM when you are not using it to save cost. So, the monthly cost can be 1/3 less for example if you are only using it 8 hours a day and stopping the VM when not in use! The good news is you can change the size after you create the VM if you need a bigger size later on – Resize Virtual Machines.
  5. Under Administrator account enter a username from the admin user and create a password. Under Inbound port rules select “Allow selected ports” and choose RDP (3389) to expose the RDP port to allow the iPad RDP client to connect.
  6. Click “Next : Disks >” and leave the defaults on the Disk page and click “Next : Networking >”
  7. Configure the Virtual Network by leaving the default name and clicking “Create new”.
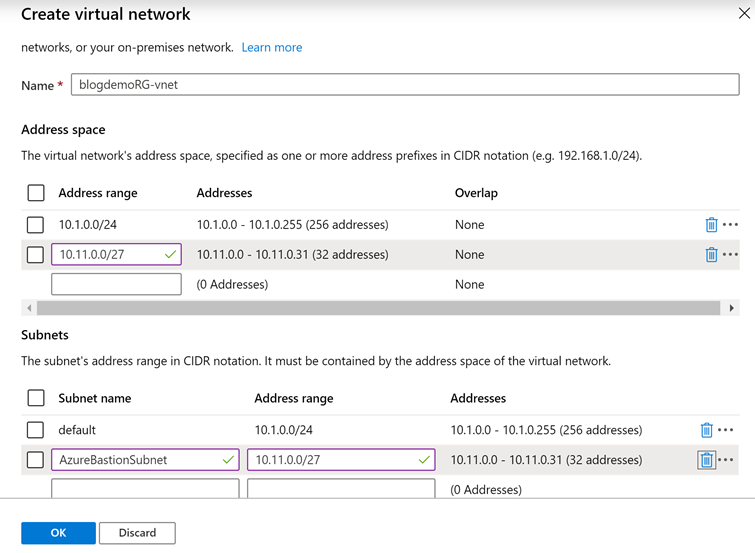
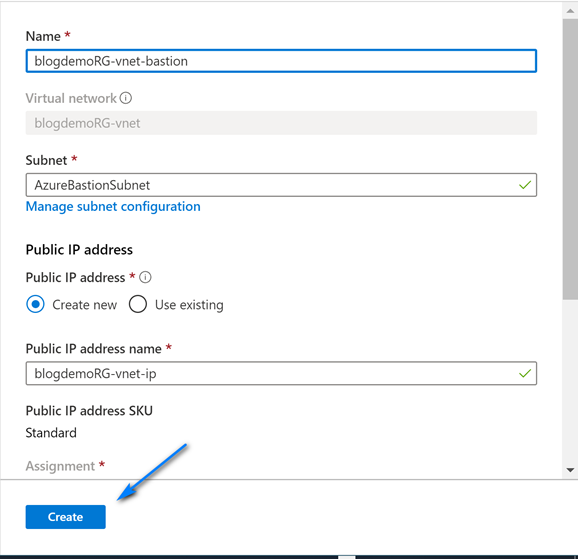
On the Create virtual network screen leave the default name and fill out the information like below (you can choose you own ranges but make sure to have one with mask 24 for RDP/HTTP and one with mask 27 for Azure Bastion) for the Address spaces and Subnets. Note we create two address spaces and subnets. One is the default with mask 24 for use with RDP and the other is with mask 27 used for Azure Bastion. The name of the Azure Bastion subnet must be AzureBastionSubnet. Click “OK” when done filling out the addresses.

  8. You can leave the Subnet setting to the default. Click “Create new” under Public IP and select “Static” under Assignment (This will allow the IP address to stay the same so you can easily connect to it each time for RDP). Leave the RDP (3389) setting and click “Next : Management >”.
  9. At the bottom of the Management section you may want to configure Auto Shutdown to assist in saving money by having the VM shutdown each night at a specific time. You can configure it to email you before the VM shutdowns as well. Make the desired setting here and click “Next : Advanced >”.
  10. You can take the defaults on the Advanced and Tags pages and go Review + Create page. Review all your settings and make sure they are correct. Make sure you have the green
    bar at top with “Validation passed” and click “Create” to create your VM.

  11. The next screen will show the status of you VM deployment. Watch this screen until you get “Your deployment is complete”. Then click “Go to resource”.
  12. On the VM resource page click “Connect”.
  13. On the RDP page you will find the Public IP of your VM and you can also click the “Download RDP File” to download an RDP file to connect from your PC. You will want to jot down the Public IP address (I have masked mine slightly for security in the blog post) for use on your iPad or other devices which support RDP.
  14. To use Azure Bastion which enables connectivity from a browser, click the Bastion at the top and then click “Use Bastion”. On the next screen you can leave the default settings as we already configured the AzureBastionSubnet in the VM setup and click “Create”. You will get a “Creating a new bastion <name>.” message. Wait until you get the “Provisioning State: Succeeded” message with the login and then login and test Bastion.NOTE: Azure Bastion at the time of this blog post is about $140/month plus network charges (first 5GB is free). I just use RDP personally, but I wanted to demonstrate how to setup Azure Bastion as it is a great service for organizations that want a more secure connection that utilizes just a browser and https. Azure Bastion pricing.

  15. When Azure Bastion connects you will see a pop-up to allow to send text and images to the clipboard when you connect. Click “Allow” to enable the clipboard for your VM (Cut/Copy/Paste).
  16. You are now connected to your new Azure VM! On the privacy screens you can take the defaults (or change if you like) and click “Accept”.
  17. After that it will prompt to see if you want your machine discoverable on the network. I picked “No” as I just have the one VM.
  18. And you are in you VM. Install the software you want to use – VS Code, Miniconda, Docker, … Whatever you like! You have a Windows 10 Pro PC in the cloud!

Configure RDP on iPad

  1. Install the Microsoft Remote Desktop (RDP) client on your iPad to connect to Azure VM from iPad. Launch the RDP Client, “RD Client”, to start the Microsoft Remote Desktop client.
  2. When launched click the “+” at the top right to start a new RDP connection to your Azure VM.
  3. Select “Desktop” on the “Add New” screen that pops up.
  4. In the “Desktop” screen select the “PC Name” section to enter the IP for your Azure VM. In the “Add Remote Desktop” screen the pops up enter the Public IP address for your Azure VM and click “Done”. (See Step 13 above in the Setup Azure Virtual Machine section).
  5. Click the “Additional Options” entry box and click “Friendly Name” in the “Additional Options” screen to enter the name of your VM. Enter a friendly name from your VM and click “Done”.

  6. Click “Desktop” on the next screen and then click “Save” to save the RDP connection in the RD Client.
  7. In the main window of the Remote Desktop client click the new connection you made to connect to your Azure VM.
  8. Enter the username and password for you Azure VM and optionally select the “Store username and password” option and then click “Done”.
  9. You should successfully be connected to your Azure VM if you entered everything correctly!!! If you want to use your mouse make sure you configured your iPad for the mouse using instructions from 9to5 Mac, How to use mouse with iPad.When you are ready to end your RDP session you click the button in the top middle with the three bars and then click “End Session”. To save money be sure to “Stop” your VM if not using it. If you configured the auto shutdown when you configured your VM it should automatically shutdown at the time you specified each day if it is up and running at that time.

Stop Azure VM when Not in Use to SAVE MONEY!


In the Azure Portal click the “Stop” button at the top to “Stop” the Azure VM when not in use.

When you are ready to use the Azure VM again, login to the Azure Portal and select the VM and click “Start”. Then you can reconnect.

I hope you enjoyed this blog and I hope you enjoy your Azure VM and iPad with a mouse as much as I enjoy using mine!

Code Like a Pirate … Intro to R and Data Science Tools in MS

So, you want to code like a Pirate! – R … R … R!

SQL Summit 2016 Version!
October 28, 2016


Jamey Johnston (@STATCowboy)


Thanks for all who attended my session at SQL Pass Summit 2016. The link to the scripts, documents and presentation materials from the session is below. If you have any questions or comments, feel free to hit me up on Twitter (@STATCowboy). I really appreciate all of you who attended and sorry if I got to statistically on you!


Download from OneDrive!


SQL Server 2016 Security Demo

RLS, Dynamic Data Masking and Always Encrypted

Jamey Johnston (@STATCowboy)

NOTE: Demo requires SQL Server 2016 CTP 2.4+ or Azure SQL Database v12.


Overview of the Demo


Security is a vital part of a DBA, Developer and Data Architects job these days. The number of attacks on databases of major retailors from criminals looking for information like email addresses, ID numbers, birthdays, etc. on individuals to be exploited and sold is ever increasing. The demo contained in the link at the bottom of this page is meant to showcase three of the new features Microsoft is bringing to the Azure SQL Database v12 and SQL Server 2016 to help combat this cyber-attacks:

Row Level Security (RLS)

Dynamic Data Masking

Always Encrypted


This first part of the demo is meant to show how an organizational hierarchy and asset hierarchy can be leveraged together to provide Row Level Security on tables in a SQL Server database using the new predicate based RLS feature in SQL Server 2016 and Azure v12. This demo is completely made up oil well production data for a fictitious organization with 153 fictional employees and come as in with ABSOLUTELY NO WARRANTY or GUARANTEE!

Also, the demo will show how to use RLS with the HieararchyID Datatype, the new Dynamic Data Masking and Always Encrypted Security Features.

This post is about the demo which will show you an advanced implementation template for RLS as well as some of the other security features. Please use the links above to the official Microsoft documentation to learn about each feature first before trying out the demo as it will help you understand the demo better.

If you attended the session at SQL Summit 2015, Overview of Security Investments in SQL Server 2016 and Azure SQL Database [DBA-327-M], which I co-presented with the Microsoft SQL Server Security team this is the demo we used at the end.


Asset and Organization Hierarchies and RLS


The basis of the security is nodes in the organizational hierarchy are granted access to levels in the asset hierarchy and those grants filter down to the members below in the hierarchy. This allows for inheritance of permissions via the Organization and Asset Hierarchy (i.e. Child nodes can inherit from Parent Nodes).

Functionality is built-in to the model to override the security model for a lower member including denying access altogether (‘NONE’ in the security map) or granting access to all data (‘ALL’ in the security map) via exceptions (SEC_USER_EXCEPTIONS). A base user table exists (SEC_ORG_USER_BASE) that has the relationship of employee to manager as well as the organizational unit id for the employee. This table would likely be fed from an HR system in a production scenario. A master table for the wells (WELL_MASTER) contains the asset hierarchy to filter security to the well data. Read the notes about the tables below for more details.

Below shows what an Asset and Organizational Hierarchy would look like (also, this is what is in the demo) and finally a walk down one branch of the organizational hierarchy to see how to apply RLS against the Asset Hierarchy.


Asset Hierarchy (snippet)


Organizational Hierarchy (snippet)


Asset and Organization Hierarchy and RLS (CEO to one USER)


Scripts and Explanations


There are 6 scripts to run to see the entire demo (and you just run them in the order they are number, 1 – 6):

1 – Oil&Gas RLS Demo – BuildTables.sql

The script will create the database, oilgasrlsdemo2016, and the tables needed for the demo

The Tables are as such:

  • ASSET_HIERARCHY – Table contains the asset hierarchy and is used to build the demo data for the asset hierarchy in the Well_Master table.
  • DATES – Generic table to hold a date dimension for use later in an Excel Power Pivot model.
  • SEC_ASSET_MAP – Table contains the entries mapping the organization units to the asset hierarchy levels for access to the data. The table would be managed by the security team for the application. Users and their subordinates are denied access to data via an entry of ou, ‘NONE’, ‘NONE’ or granted all access via an entry of ou, ‘ALL’, ‘ALL’.
  • SEC_ORG_USER_BASE – Table contains the employees including the employee to manager parent/child relationship to build an organization hierarchy and the organizational unit id for mapping to asset hierarchy levels for security. This table would likely be fed from an HR system. Also, will demonstrate Always Encrypted in this table.
  • SEC_ORG_USER_BASE_HID – Same as SEC_ORG_USER_BASE but includes HierarchyID column to demonstrate RLS with HierarchyID data types and to demonstrate Data Masking.
  • SEC_ORG_USER_BASE_MAP – Table contains the employee data including an entry (SECURITY_CLEARANCE) to denote the security clearance the employee is granted by walking down the organization hierarchy and finding the lowest level above including themselves that has been granted access to data. The SEC_ASSET_MAP table is used along with the SEC_ORG_USER_BASE table to generate the data in this table. The procedure REFRESH_SECURITY_TABLES is called to refresh the data in this table.
  • SEC_USER_EXCEPTIONS – Table contains entries to allow for overrides of the organization hierarchy based model. Any employee entered here will use permission defined in this table instead of what is inherited from the organizational hierarchy.
  • SEC_USER_MAP – This table is generated by the REFRESH_SECURITY_TABLES procedure and generates the asset level access for each user in the database based upon the values in the security tables SEC_ORG_USER_BASE_MAP, SEC_ASSET_MAP and SEC_USER_EXCEPTIONS. This is the ONLY table used by the functions for the Security Policy. The other SEC_ tables are used to generate this table for RLS.
  • WELL_DAILY_PROD – Contains COMPLETELY made-up and randomly generated daily well production data for Oil, Gas and NGL. Primary key is WELL_ID and RLS is achieved by using the asset hierarchy in the WELL_MASTER table to filter the WELL_IDs. This is a Clustered ColumnStore Indexed table.
  • WELL_MASTER – Contains COMPLETELY made-up and randomly generated master well data including the made up asset hierarchy. This is the main business table used for RLS for ALL well tables.
  • WELL_REASON_CODE – Contains COMPLETELY made-up and randomly generated daily well downtime data for Oil, Gas and NGL. Primary key is WELL_ID and RLS is achieved by using the asset hierarchy in the WELL_MASTER table to filter the WELL_IDs.


2 – Oil&Gas RLS Demo – LoadTables.sql

This script is used to load or generate the demo data including user and security tables and hierarchy and well data. There are two parameters close to the top that can be used to specify the amount of data to load – @wellcount and @drillyearstart. @wellcount specifies the number of wells to generate and @drillyearstart specifies the first possible year to use for a well. The start date for a well will be randomly selected between @drillyearstart and the current year the script is run.


3 – Oil&Gas RLS Demo – Security Setup.sql

This script sets up the RLS functions, policies and the procedure REFRESH_SECURITY_TABLES. The procedure REFRESH_SECURITY_TABLES is used to generate the RLS security mappings in the SEC_ tables as described in the sections above. In a production environment this procedure would need to be run every time the hierarchies were updated or new users were added to the database.

This script also will build users in the database based on the userids generated in SEC_ORG_USER_BASE table for testing RLS.


4 – Oil&Gas RLS Demo – Test RLS Security.sql

This script contains sample queries to test RLS at different levels in the organizational hierarchy and asset hierarchy. It also will add another entry in the security table granting a user access to another level in the hierarchy along with their current level and run the procedure to update the security to include this new entry.


5 – Oil&Gas RLS Demo – RLS Security with HierarchyID and Data Masking.sql


This script makes a copy of the SEC_ORG_USER_BASE table called SEC_ORG_USER_BASE_HID that contains a version of the Organizational Hierarchy using the HierarchyID Datatype. It shows how to populate a HierarchyID Datatype from a Parent/Child Hierarchy and will implement RLS security using the HierarchyID Datatype as well as add some new columns, EMAIL_ADDRESS and DOB (Date of Birth) to the table to highlight Dynamic Data Masking in SQL Server 2016.


Info about HierarchyID – https://msdn.microsoft.com/en-us/library/bb677290.aspx


6 – Oil&Gas RLS Demo – Always Encrypted.sql

This script will setup the Master and Column keys for Always Encrypted as well as add a new encrypted column, SSN, to the SEC_ORG_USER_BASE table to test Always On Encryption. NOTE: If your database you are using for this demo is on a separate server than where you will run the application (see below) included in the download to test all the features you will need to run this script from SSMS on the machine you run the application and it will need .NET 4.6.


ERD of O&G RLS Demo DB


Demo Application


There is an application built in Visual Studio 2015 (.NET 4.6) that you can use to test out the demo once you run all 6 scripts (Source code is included as well!). Just run the EXE in the download on a machine with .NET 4.6 installed and the instructions are at the bottom of the application (see screenshot below).

Use the WELL_MASTER, WELL_DAILY_PROD and/or WELL_DOWNTIME to test the Parent/Child RLS Demo (Scripts 1 – 4). Use the SEC_ORG_USER_BASE_HID table to test the RLS with HierarchyID and Dynamic Data Masking (Script 5). Finally, use the SEC_ORG_USER_BASE table to test the Always Encrypted. You can EDIT the fields by clicking inside of them so for the Always Encrypted Demo you would click in the cell for SSN for an employee and enter a valid SSN and click “Commit” (see screenshot below).


Demo Instructions, Download and Contents


Below is the contents of the demo download and descriptions about each file/folder. To run through the demo, do the following:

  1. Download and extract the files to a folder
  2. Run all the scripts in the MSSQL 2016 folder in order, 1-6, on SQL Server 2016 CTP 2.4+ or Azure SQL Database v12.
  3. Then use the OGSecurityDemo2016.exe file to run the Demo Application

MSSQL 2016 – Folder with the 6 demo scripts
OSSecurityDemo2016 –
Folder with the source code (VS2015 .NET4.6) for the Demo Application
SimpleRLSExample –
Folder with a simple RLS Demo (start slow)
O&G_Demo_ERD.png –
Graphic of ERD
OGSecurityDemo2016.exe –
Demo Application (you can just run it if you have .NET 4.6)
Oil&Gas SQL Server Security Demo.docx –
Overview of the Demo


Link to download – https://onedrive.live.com/redir?resid=4930901E9435C751!135238&authkey=!AF7fpcw5K5waySg&ithint=folder%2czip


Hope you enjoy and tweet me @STATCowboy if you have questions, comments or concerns or need help with the demo!

Setup Azure SQL Database using the New Azure Portal

April 7, 2015

Jamey Johnston

Azure SQL Database is a relational database-as-a-service that allows for scaling up to thousands databases. It is a self-managed service that allows for near-zero maintenance, in other words, Microsoft handles all the backups, patching and redundancy. Azure SQL Database offers service tiers that allows for dialing up or down the horsepower as needed which also means the pricing can scale up or down. Pricing of the Service Tiers range from ~ $5/month to the slowest and smallest in size to ~$3,270/month for the fastest and largest.

More Info on Azure SQL Database

In this post we will walk through the steps to create an Azure SQL Database using the new Azure Portal. Please note the new Portal is still in beta so the steps and screenshots may change as Microsoft still rolls out the new portal.

This post is based on the documentation on Azure, Get started with SQL Database by jeffgoll, which shows how to setup an Azure SQL Database using the older Azure Portal.


Step 1: Create an Account on Azure


This step can be skipped if you already have an account on Azure. If not, go to http://azure.microsoft.com and click on the “Free Trial” in the upper right corner to get started.


Step 2: Logon to the New Azure Portal and Provision a Virtual Server and SQL Database


  1. Access the new Azure portal at http://portal.azure.com and login with your Azure Account.
  2. Click “New” at the bottom left of the page, then “Data + Storage”, then “SQL Database” to start the SQL Database wizard.

  3. In the “SQL Database” panel enter your desired Azure SQL Database name in the “Name” field (e.g. myfirstazuresqldb) then click “Server / Configure required settings“. In the Server Panel pop-out to the side, click “Create a new server” (I am assuming if you are reading this tutorial you don’t have an existing Azure SQL Server setup!).


  4. In the “New Server” panel pop-out enter an Azure SQL Server name in the “SERVER NAME” field (e.g. myfirstazuresqlserver), a Server Admin Login account name in the “SERVER ADMIN LOGIN” field (e.g. SQLAdmin), a password in the “PASSWORD” field and enter the password again in the “CONFIRM PASSWORD” field. Choose the location where you want the server to reside by clicking in the “LOCATION” area and choosing the Location. Leave the “Yes” chosen in the “CREATE V12 SERVER (LATEST UPDATE) so we can learn some new features in a later blog post. Leave “ALLOW AZURE SERVICES TO ACCESS SERVER” checked. Click “OK” at the bottom of the “New Server” panel to continue.


  5. Back on the “SQL Database” panel leave “Blank Database” selected in “SELECT SOURCE” option and click on the “PRICING TIER” option and choose “B Basic” in the Pricing Tier panel pop-up and click “Select” at the bottom.


  6. On the “SQL Database” panel you can set the desired Collation but we will leave it the default for now. Click on “Resource Group”, then in the “Resource Group” panel choose “Create a new resource group” and then in the “Create resource group” panel type a resource group name in the “Name” field (e.g. myfirstresourcegroup”).


  7. Choose the “Subscription” (e.g. Visual Studio Ultimate with MSDN) to pay for the Azure service. Check “Add to Startboard” to have the SQL Database show up on the Portal front page. Then click “Create” to begin provisioning your new Azure SQL Database! 🙂


  8. The page will go back to the Portal front page and a tile will appear with the title “Creating SQL Database”. Also, in the side bar to the left you will see a notification.


  9. Once the database is provisioned the pages will refresh and show the Azure SQL Database Dashboard page.


  10. Your database is provisioned!


Step 3: Add Firewall Rule to Access Azure SQL Database


  1. Click on the Azure SQL Server under the “Summary” section.


  2. The “SQL Server” panel will pop-out to the right, click “Settings” to open up the SQL Server configuration panel to the right.


  3. In the “Settings” panel click on “Firewall”. In the “Firewall Settings” panel that pops-out enter a “RULE NAME” (e.g. Home), the START IP and END IP which will probably be the same IP address if testing from home. You can use a website like whatismyip.com to get your external IP address. Click “Save” at the top once finished entering the values. (NOTE: The values below are not valid and you should enter the correct ones for your location).

    Your IP may change so check periodically to make sure you have the correct IP addresses in the firewall rules. Also, if trying to connect from work your work firewall may block access to the default port of 1433 which is used for access to the Azure SQL Database so if you are having issues trying to connect from work they may be your issue! J


  4. A message should appear indicating the firewall rules were successfully updated. Click “Ok”.


  5. Firewall is configured.


Step 4: Setup SQL Server Management Studio to Manage and Access Azure SQL Database


  1. Finally to test your new Azure SQL Database download the SQL Server 2014 Management Studio Express and install using the defaults. Choose the 32-bit or 64-bit version depending on your O/S version (probably 64-bit for most).


  2. Launch SQL Server 2014 Management Studio from your PC and login to the server you created in Step 2 using the server name, admin account and password and click “Connect”.


  3. Congratulations you have created your first Azure SQL Database!